Creating a Desktop Variant
Desktop Variants enable you to define variations of a Windows desktop from a single base image. For example, if MS Office, SolidWorks, and AutoCAD are installed on the base image, you could create a variant with MS Office only (eg. Office Desktop) or a variant containing MS Office and SolidWorks (eg. Engineering Desktop), and so on.
To create a Desktop Variant, you must first install all necessary applications, create a base image, and deploy the image to production servers. This can be accomplished from the Servers screen. Once the base image has been created (and the base image server has been started), you may define the Desktop Variant via the Apps screen.
Create a Desktop Variant
Create a New App
Using your preferred web browser, navigate to the URL for your Apporto system, for example, “mycompany.www.apporto.com”, and log in to the system using your credentials.
Click the Apps ![]() icon in the Navigation panel.
icon in the Navigation panel.
The ‘Apps’ screen displays.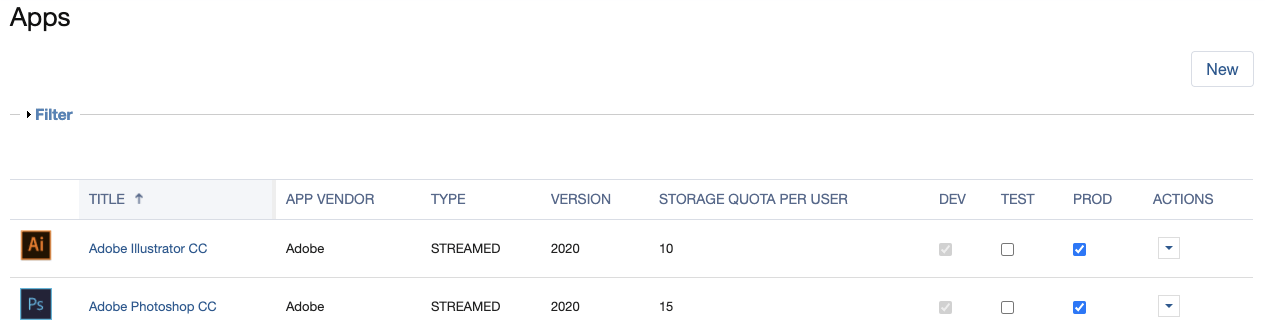
The Apps screen lists all apps and desktops currently configured for your Apporto instance.
Click New in the upper right corner.
The ‘Select the Type of App’ dialog displays.

Select Streamed
The Streamed section expands to show sub-types.

Select the desired sub-type (eg. Windows desktop variant).
The ‘Create App – Windows Desktop’ screen displays.

Enter the appropriate values for the app:
Enter the name of the app or desktop in the App name text box.
Enter the name of the app vendor in the App Vendor text box.
If desired, Upload a logo image for the app. Logos are recommended since they make it easy for users to quickly recognize applications in the App Store.
Logo files must be < 5 MB. Allowed file types include png, gif, jpg, or jpeg.
Images must be smaller than 100×100 pixels. Images larger than 100×100 pixels will automaticcally be scaled.
Select the relevant Base Image Server from the dropdown menu.
- NOTE: The base image server must be running in order to create a Desktop Variant. (You can check the server state and start a server from the Servers screen. It takes 1-2 minutes for the server to start.)
Click on Applications to expand this section.
Wait for all applications to display.

By default ALL applications are selected. So, all icons will be accessible on the desktop by default.
If you do NOT want an application to show on the desktop variant, simply uncheck the relevant box.
IMPORTANT: We do NOT recommend creating both Windows Desktops and Windows Desktop Variants on the same servers. The results may be unexpected.
Optional Fields
Click the Optional Fields link to enter any optional fields.
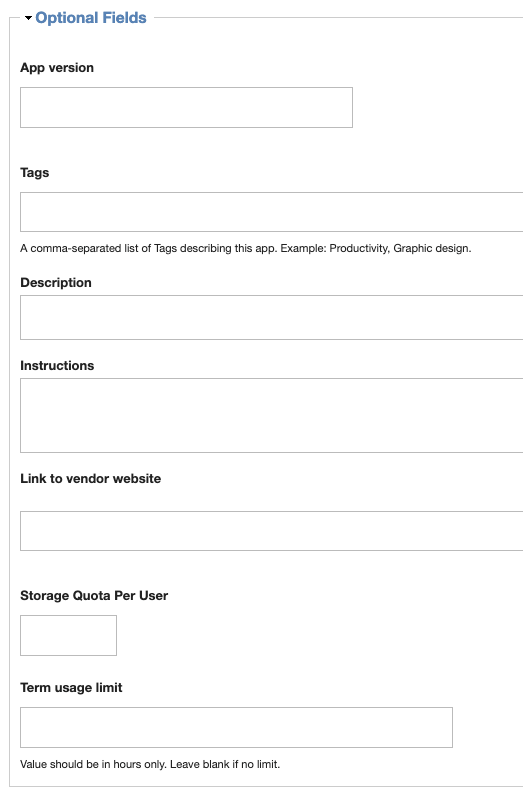
Enter the version number for the app in the App version text box.
Enter one or more keywords that describe the app in the Tags text box. When entering multiple keywords, separate entries with commas.
If desired, enter a brief Description of the app, any special Instructions, and/or a Link to vendor website.
If desired, enter a maximum Storage Quota Per User (in Gigabytes; 30 maximum). Note: It is more common to define storage quotas for Groups, but this can be set by App here.
If desired, enter a Term usage limit (in hours) to limit the total time a user can use the app during the semester. The current semester start and end date are entered in the Academic Calendar in Settings.
Click the Checkboxes link to select relevant options.
In most cases you can accept the default values.
Check Enable H264 to enable a faster compression method for desktops/apps running on a GPU server.
Host Information
Enter key information to tell the system where the application is installed and which streaming and SFTP servers to connect to.
Many fields are pre-populated with default values.
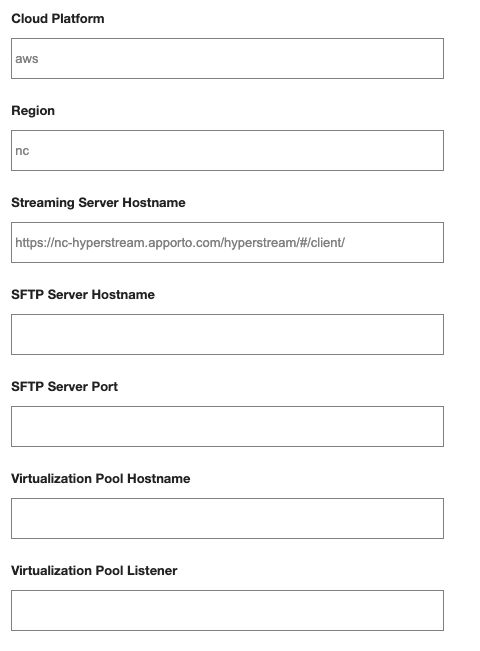
Enter the Cloud Platform (eg. aws, azure, etc.)
Enter the Region (eg. nc = northern california)
Enter the Streaming Server Hostname where the streaming servers are running.
Enter the SFTP Server Hostname (optional) which enables users to upload and download the file in the SFTP Hostname field.
Enter the SFTP Server Port
Enter the Virtualization Pool Hostname where the application or desktop is installed.
Enter the Virtualization Pool Listener
Create App/Desktop
Use the Environment checkboxes to specify the environments to which you wish to publish the app (ie. DEV, TEST and/or PROD). You must select PROD in order to publish the app to users in your production environment. The DEV checkbox is enabled by default and cannot be deselected.
When all necessary information has been entered, click Submit to create the app.
The ‘App Detail’ screen displays.
The app can now be published to the desired groups or users.
Test your App/Desktop
Once you’ve created an application or desktop, you may want to test it. When testing a Desktop Variant, there are special considerations:
- Apporto Admins see ALL installed applications / desktop shortcuts when they launch a desktop (regardless of the defined variants).
- So, in order to see what an end user will see, you can impersonate an end user – one who has been granted access only to that specific Desktop Variant.
- If multiple Desktop Variants have been published to the Group the user belongs to, the user will see the union of shortcuts on the desktop when they launch any of the variants they have access to.
Here are the recommended test steps:
- Make sure the Desktop Variant is not published to PROD.
- Publish the Desktop Variant to a Group (that does not have any other Desktop Variants published to it)
- Impersonate a user in the Group.
- Navigate to the App Store and launch the Desktop Variant.
- Verify everything is working as expected (i.e. you see all expected shortcuts on the desktop).
EXAMPLE: If you create two variants:
- ONLY Word
- ONLY SPSS
If a user belongs to group 1 only, they will see only Word on the desktop.
If a user belongs to group 2 only, they will see only SPSS on the desktop.
If a user belongs to groups 1 & 2, they will see Word and SPSS on the desktop.
Please contact [email protected] if you have any questions.