Managing Non-Persistent Virtual Machines
Non-Persistent Virtual Machines (VMs) provide users with a full virtual machine. However, the VM is not assigned to a specific user and the environment is not persisted across sessions. Each time a user launches a non-persistent VM, a VM is selected from a pool of available VMs.
![]() Non-Persistent VMs are similar to Apporto’s standard desktops (e.g. Windows Desktop), except there is a limit of one user per server.
Non-Persistent VMs are similar to Apporto’s standard desktops (e.g. Windows Desktop), except there is a limit of one user per server.
This short guide will show you step by step how to:
View Non-Persistent Virtual Machines
Using your preferred web browser, navigate your Apporto instance (eg. “mycollege.www.apporto.com”) and log in using your Admin credentials. Faculty may also access VMs if their role has permissions.
Click the Servers ![]() icon in the Navigation Panel.
icon in the Navigation Panel.
The ‘Servers’ screen displays.
Click the Non-persistent VMs tab.
The ‘Non-persistent VMs’ screen displays.
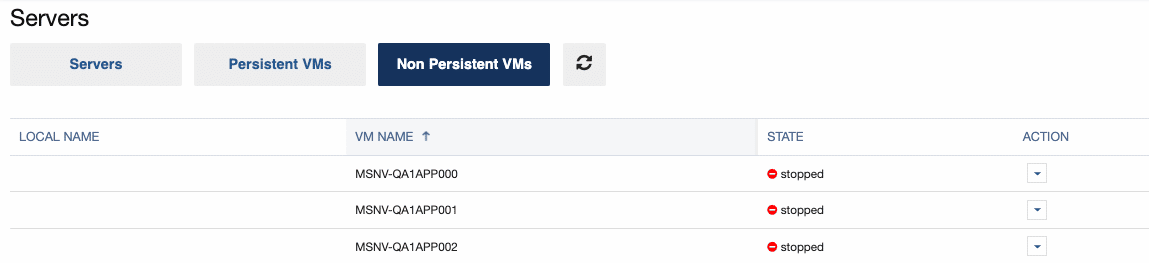
A list of available non-persistent VMs is displayed along with basic information including a user-defined LOCAL NAME, the unique VM NAME, and system STATE.
The base image machine can usually be identified by a unique name ending in 000. Subsequent machine names end in 001, 002, and so on.
Manage Non-Persistent Virtual Machines
Non-persistent Virtual Machines may be started and launched.
To start a Virtual Machine, click the down arrow in the ACTION menu.
Click Start Server
Wait about 30 seconds (AWS) to 2 minutes (Azure) for the server to start.
Once started, the INSTANCE STATE will change from stopped to running. Also, the button will change from Start to Launch. Click Launch to launch the desktop.
![]() Users launch their VM from the App Store whereas Admins and/or Faculty may launch the base image (or any production VM) from the Persistent VMs screen.
Users launch their VM from the App Store whereas Admins and/or Faculty may launch the base image (or any production VM) from the Persistent VMs screen.