Managing Persistent Virtual Machines
Persistent Virtual Machines (VMs) are assigned to specific users. They are useful when users need administrative permissions to a machine (for example, to install software or modify the environment). Changes to the environment are persisted across sessions.
Also, Persistent VMs are required if you use the following Apporto features:
- Cyber Labs
The Apporto Cyber Lab is a persistent VM with embedded VMs (eg. Windows and Linux machines). Users can install or create malware and stage attacks on the embedded VMs.
- Extended Compute
When users need to run long processes (eg. simulations, rendering, etc.) that run overnight or for multiple days, Apporto offers “Extended Compute.” Users are assigned to Persistent VMs on servers with no timeouts. You may set usage limits and monitor usage relative to budget.
This short guide will show you step by step how to:
View Persistent Virtual Machines
Using your preferred web browser, navigate your Apporto instance (eg. “mycollege.apporto.com”) and log in using your Admin credentials. Faculty may also access VMs if their role has permissions.
Click the Servers ![]() icon in the Navigation Panel.
icon in the Navigation Panel.
The ‘Servers’ screen displays.
Click the Persistent VMs tab.
The ‘Persistent VMs’ screen displays.
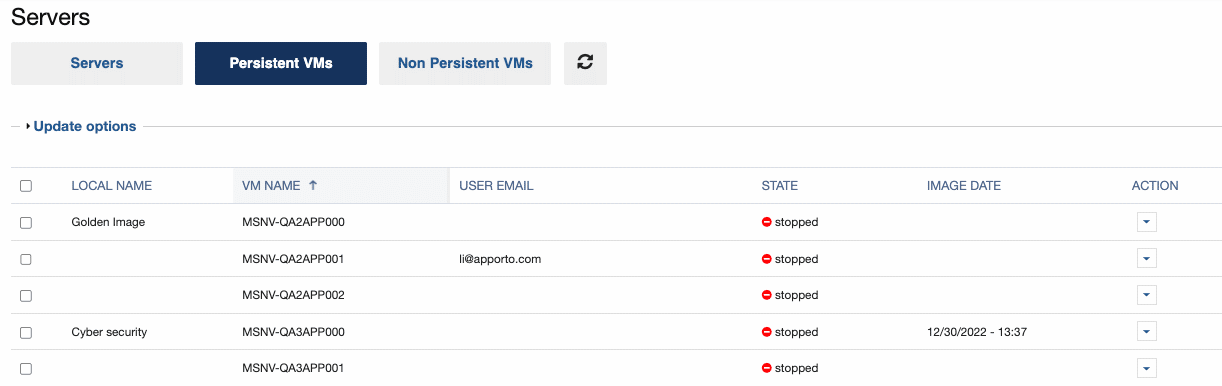
A list of persistent VMs available for your instance shows.
The virtual machines are grouped by ‘farm’ with the base image for each farm listed first, following by a list of production VMs in numeric order. The base image VM can usually be identified by a name ending in 000.
The following information about each VM is provided:
- The LOCAL NAME is an optional, user-defined name.
- The VM NAME is a unique identifier for the virtual machine. This field is only populated when a virtual machine has been assigned to a user.
- The USER EMAIL is the email of the user assigned to the virtual machine.
- The system STATE tells you if the virtual machine is stopped or running.
- IMAGE DATE is the date of the most recently created image, if available. This field is only populated for base image machines.
Manage Persistent Virtual Machines
Assign / Unassign a VM
Persistent virtual machines are created ahead of time by Apporto, but are not assigned until a user launches the desktop. Assignment occurs automatically when the desktop is launched.
If all VMs have been assigned, the next user who tries to launch the app/desktop will see an error message explaining that no VMs are available.
If a user no longer needs access to a Persistent VM, you may free it up by removing the assignment.
To unassign a Persistent VM, locate the relevant VM, click the down arrow in the ACTION menu, and select Unassign.
Create an Image
The first Persistent Virtual Machine listed (in a grouping of VMs) is the Base Image. It can usually be identified by a VM NAME ending in 000.
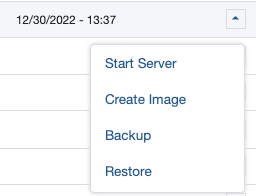
To install software and configure the Base Image VM, click the down arrow in the ACTIONS column.
Select Start Server and wait about 30 seconds (AWS) or 2 minutes (Azure) for the servers to start. The state will change from stopped to running.
When the server is running, select Launch Server
The app or desktop opens in a new browser tab.
Install the desired software and make any necessary configurations.
Sign out of Windows or close the browser tab when you are finished.
To create a new image, select Create Image
![]() Creating an image prepares a server for cloning (temporarily removing it from Active Directory, renaming it, etc.) and this usually requires rebooting. Whereas taking a Backup just requires taking a snapshot of the VM.
Creating an image prepares a server for cloning (temporarily removing it from Active Directory, renaming it, etc.) and this usually requires rebooting. Whereas taking a Backup just requires taking a snapshot of the VM.
This process can take 5-120 minutes (AWS) or 10-20 minutes (Azure) depending on the size of the image.
You will be notified by email and in the product (bell icon in the top menu) when the process finishes.
The IMAGE DATE field will be updated with the date and time of the most recently created image (only one image is persisted – the last one created).
Re-image a VM
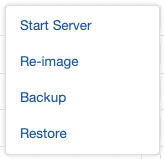
To re-image a production VM (identified by names ending in 001, 002, etc.), identify the desired VM and select Re-image from the ACTIONS menu.
Re-imaging typically takes less than 30 minutes (AWS) or less than 2 hours (Azure) depending on the size of the farm.
You will be notified by email and in the product (bell icon in top menu bar) when the process completes.
Re-image Multiple VMs
The steps above enable you to re-image specific VMs, one at a time. This is useful if only a few students encounter issues with their VMs. But, if you have an entire class of students learning a new skill and making a mess of their VMs (e.g. “breaking” the Apporto Cyber Lab), your faculty may need to re-image multiple VMs after class – to reset them to the base image.
In this case, simply select the boxes for the relevant VMs (or check the top box to select all VMs) and click Update Options.
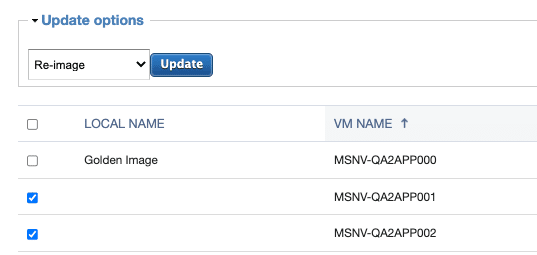
Select Re-image from the dropdown menu and hit Update.
This process typically takes less than 30 minutes (AWS) or less than 2 hours (Azure) depending on the size of the farm.
You will be notified by email and in the product (bell icon in top menu bar) when the process completes.
Backup or Restore a VM
To backup a virtual machine, select Backup
This process can take 5-120 minutes (AWS) or 10-20 minutes (Azure). Also, even though the process can take a long time on AWS, the VM is available for use after 5-10 minutes.
To restore a VM to the last backed up version, select Restore
Restoring typically takes 10-20 minutes (AWS and Azure).
![]() Restoring a VM restores it to the most recent backed up image for that specific VM.
Restoring a VM restores it to the most recent backed up image for that specific VM.
![]() Re-imaging a VM will remove the current image and replace it with the Base Image (also known as the “Golden Image”).
Re-imaging a VM will remove the current image and replace it with the Base Image (also known as the “Golden Image”).